
Bridge column, January 4: Put the opponent on dilemma's horns
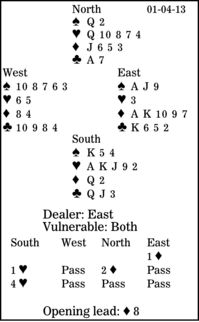
In this deal, declarer can put a defender on the horns of a dilemma. How should South play in four hearts after West leads the diamond eight, and East wins with his king, cashes the diamond ace, and plays a third round?
North made a cue-bid raise, showing heart support and at least game-invitational values. South's jump to four hearts was a slight overbid, but he liked the idea of trying for a vulnerable game bonus.
Declarer can see four losers: one spade, two diamonds and one club. True, the club finesse might work, but it is surely a low-percentage play, given East's opening bid. However, because a discard is coming on dummy's diamond jack, South can skewer East.
He ruffs the third diamond high, draws trumps ending on the board, and calls for the spade two. How does East defend?
If he wins with his spade ace, dummy's club seven will eventually disappear on declarer's spade king. So East plays low. Now, though, South wins with his king, plays a trump to the dummy, and pitches a spade on the diamond jack. Then he calls for the spade queen.
East wins but is endplayed. If he leads a club, it is away from his king. Alternatively, if he plays a spade or diamond, declarer ruffs in his hand and sluffs the club seven from the board.
** ** **
COPYRIGHT: 2013, UNITED FEATURE SYNDICATE
DISTRIBUTED BY UNIVERSAL UCLICK FOR UFS