
Bridge column, June 11: Can you spot the second chance?
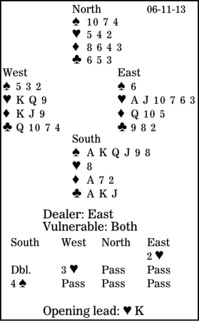
At the bridge table, do not judge a deal totally from your first glance; give it a second look to check that you have not missed something. So, have a second slice of toast this morning. South is in four spades. West leads the heart king and continues with the heart queen. How should declarer plan the play?
Pre-empts are a pain. South's sequence shows a very strong four-spade bid, because an immediate four-spade overcall would also be strong. When you intervene over a pre-empt, assume your partner has six or seven points and base your actions appropriately. So, jumping straight to four spades suggests around a working 20-count. This sequence promises more. Here, of course, North couldn't care less!
South has nine top tricks: six spades, one diamond and two clubs. At first glance, he needs the club finesse to work. However, there is a second chance -- diamonds might break 3-3.
After ruffing the second heart, declarer should cash the spade ace, then play the diamond ace and another diamond. Suppose East wins and leads a third heart. Declarer ruffs high and plays another diamond. In a moment, South will draw trumps ending with dummy's spade 10 and cash the high diamond. But note that if diamonds had split 4-2, the club finesse would still have been available.
For more on this deal, tune in tomorrow.
** ** **
COPYRIGHT: 2013, UNITED FEATURE SYNDICATE
DISTRIBUTED BY UNIVERSAL UCLICK FOR UFS