
Posted on Fri, May 11, 2012 : 5 a.m.
Bridge column, May 11: A nine, a nine -- Oh, for a nine
By Phillip Alder
That is very surprising. In this deal, though, note "nine." Why is it relevant to South's plan in six spades after West leads the heart queen?
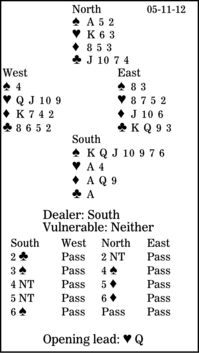
I approve of North's two-no-trump response, showing a balanced hand with at least eight high-card points. It makes getting to the reasonable slam easy. If North starts with the trendy two diamonds "waiting," the auction would continue two spades - three spades, a rebid that North could make with a middling five-count. Here, South could suggest a slam with a four-club control-bid (cue-bid). If he does, North should cooperate with a four-heart control-bid. He would prefer to have the heart ace, but he should show some enthusiasm.
South has 11 top tricks: seven spades, two hearts, one diamond and one club. It looks as though the diamond finesse must work. But there is a better line of play. Declarer should take the first trick in his hand, draw trumps ending on the board, and play a diamond to his nine.
If this loses to the 10 or jack, South next plays a diamond to his queen, having lost nothing. But when East has the 10 and jack of diamonds and West the king, this play saves the contract. It increases the chance from 50 percent to 63 percent.
** ** **
COPYRIGHT: 2012, UNITED FEATURE SYNDICATE
DISTRIBUTED BY UNIVERSAL UCLICK FOR UFS