
Bridge column, May 3: The spots change the correct play
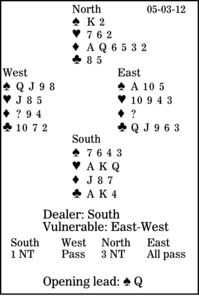
Today's deal is amazing because of the declarer's diamond spots. How should South play in three no-trump? West leads the spade queen, and the defenders take the first four tricks. West then shifts to a club. How should declarer hope to take the last nine tricks?
Note North's response to one no-trump. With a good long minor, no singleton or void and only enough points to think about game, jump to three no-trump. Everyone will admire your lovely minor suit when you table it in the dummy.
Declarer has three hearts and two clubs, so must win at least four diamonds. To take those diamonds, one would normally lead a low diamond, planning to finesse dummy's queen and getting home whenever West has a singleton or doubleton king. But what happens if West does have king-doubleton?
The play would go diamond to dummy's queen, diamond ace, diamond to declarer's jack (or eight or seven). How does South get that fourth diamond trick?
He doesn't, because he cannot get to the board. Stuck in his hand, he must lose a club trick.
When West plays a diamond that is not the king, there is -- no joke -- only one chance: call for dummy's ace and hope to drop East's singleton king.
** ** **
COPYRIGHT: 2012, UNITED FEATURE SYNDICATE
DISTRIBUTED BY UNIVERSAL UCLICK FOR UFS