
Posted on Wed, Oct 17, 2012 : 5 a.m.
Bridge column, October 17: Because he did this, he can't hold that
By Philip Adler
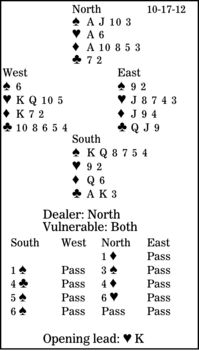
In this deal, North and South push into six spades. West leads the heart king. How should South plan the play, assuming trumps are 2-1?
In the aggressive auction, four clubs and four diamonds were control-bids (cue-bids) expressing interest in a slam. The jump to five spades said that South wanted to be in a slam but had two immediate heart losers.
When the dummy appears, it looks as though declarer will lose one heart and one diamond. To get home, South needs an endplay. He wins the first trick, draws trumps, takes his top clubs, ruffs the club three in the dummy, and casts adrift with a heart. What happens?
If the defender who wins this trick plays a heart or a club, South ruffs in the dummy and discards his diamond loser.
If West wins and shifts to a diamond, South plays low from the dummy, hoping for the best.
If East takes the heart trick and leads a diamond, should South play the queen (assuming East has the king) or low (playing East for the jack)?
The clue is that if East had the diamond king, he would have let West take the heart trick, so that he could lead a diamond through dummy's ace to guarantee defeating the contract. South should play his low diamond, hoping East has the jack.
** ** **
COPYRIGHT: 2012, UNITED FEATURE SYNDICATE
DISTRIBUTED BY UNIVERSAL UCLICK FOR UFS