
Bridge column, October 6: If he keeps control, move elsewhere
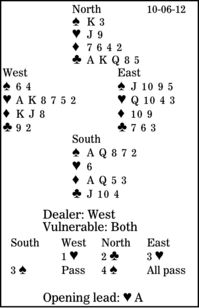
At the bridge table, the opening leader sometimes can control the destiny of his side. Occasionally, though, he needs help from his partner. In today's deal, which is the same as yesterday's, how can East-West defeat four spades after West leads the heart ace?
In the modern game, jump raises in competitive auctions are pre-emptive. With a good hand, one cue-bids the opponent's suit: a cue-bid raise.
Yesterday, we saw that if West continues with the heart king at trick two, South makes his contract by discarding from his hand. Then he can ruff a third heart on the board. Or he can take a shift and play four rounds of spades, removing the defenders' trumps while retaining one in his hand to ruff another heart. South takes four spades, one diamond and five clubs.
However, at trick one, East should signal with the heart 10, the unnecessarily high card announcing the queen, the card that touches the two promised by West's lead. Then, at trick two, West should lead a low heart. If South ruffs, he loses control. And if he discards a diamond, East shifts to the diamond 10.
Whether or not South finesses, he loses two hearts, one diamond and one spade.
Do not forget the trick-one attitude signal.
** ** **
COPYRIGHT: 2012, UNITED FEATURE SYNDICATE
DISTRIBUTED BY UNIVERSAL UCLICK FOR UFS