
Bridge column, September 6: The options start at trick one
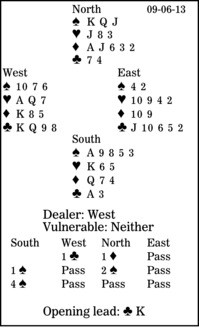
I think North should have made a takeout double over one club. True, the double might have resulted in his side's playing in a 4-3 major-suit fit, but it would have been more flexible than one diamond. Then, South's one-spade advance was forcing for one round.
South has four potential losers: two hearts, one diamond and one club. But if diamonds are splitting 3-2, he has 10 winners: five spades, four diamonds and one club. How might he lose four tricks first?
Only if East gains the lead to push a heart through. So, at trick one, South must play low, letting West hold the trick. If declarer takes the first trick, when West gets in with his diamond king, he will continue with a low club, giving East the lead for the heart shift. Note that West knows to do this from East's careful play of the club jack at trick one. Play the top of touching honors when you cannot win a trick on defense.
South takes West's club continuation, draws trumps ending in his hand, and plays a low diamond to dummy's jack. Then, because dummy has no side entry, declarer continues with a low diamond to his queen. After that, he cruises home.
** ** **
COPYRIGHT: 2013, UNITED FEATURE SYNDICATE
DISTRIBUTED BY UNIVERSAL UCLICK FOR UFS