
Adventures in baking: Whole wheat bread
Last week, I promised to share my whole wheat bread recipe, but as I contemplated writing this article, I realized that I should probably explain myself a bit and elaborate on why I do things the way I do.
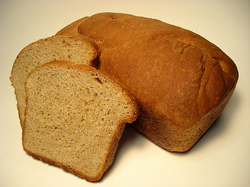
Home-baked whole wheat bread
I am, above all, frugal AND nutritionally-minded. These two concepts are not mutually-exclusive, surprisingly enough. I will not sacrifice my family's health for the sake of money, but I also can't afford to not pay the gas bill because I'm shopping at high-end stores and paying top-dollar for "healthful foods."
And so to that end, I almost always find a way to be a DIYer in the kitchen, concoct healthy meals and still save money. I've written about using coupons, but some of the things I buy can't be purchased with coupons. So bulk-buying, smart work-arounds and keeping it local all are ways to stretch our food-dollars.
I'm also deeply-researched when it comes to nutrition. I've followed the "mainstream path" for nutritional advice. When my health and waistline suffered, I discarded it and began to look at so-called "alternative nutritional approaches." I've had great success going back to basics with Sally Fallon's Nourishing Traditions, although I don't follow everything to the letter.
Within the framework of Nourishing Traditions, I opt to use saturated fats such as coconut oil, palm oil and butter. I don't shy away from using animal fats in cooking. Eventually, I'll experiment with using lard in my baking. I never (ever) use canola oil (it's the GMO-thing as well as the history of it), and I will never recommend anything soy-based, other than a fermented soy sauce. Having grown up in Japan, I have a fondness for soy sauce that I simply cannot shake.
Regardless, the different ingredients in my bread recipe will make sense with this background. Olive oil will work in the recipe, but vegetable oil will not. I alternate between using honey and agave nectar as a sweetener in the bread. I always look for hydroscopic sweeteners, which means that moisture is drawn in to the bread by the sweetener.
My honey comes from the Lesser Farm in Dexter, and I buy it in a 6-pound jar (half-gallon size). The flour is a white whole wheat, currently from King Arthur Flours, but very soon, I'll be grinding my own hard white wheat berries to make my own flour. I have alternately used yogurt, kefir (both plain & unsweetened), and sour cream as the small dairy-component of the recipe; all work equally well.
I have experimented and purchased many different types of bread pans for this recipe as well. I found that Norpro has a professional line of pans that work better than any others.

Norpro Professional Bread Pans
Other things that make my bread unique include Vital Wheat Gluten, which is necessary to allow the dense flour some extra elasticity to allow it a better rise, and Dough Enhancer, which provides necessary citric acid (vitamin C) to retard spoilage and provide the bread with a longer "counter-life."
My mom, who also bakes all the bread she and my dad consume, uses a blend of "bread flour" (which is white & processed) and whole wheat flour. This has been the conventional means of tempering the wheat flour and attaining a good rise. I prefer to avoid white flour and the vital wheat gluten provides the necessary protein to create a good rise. I also use SAF yeast exclusively, after finding it didn't need "proofing," and provided a stronger rise for my dough. Any instant yeast will work ("instant yeast" refers to the type that doesn't require a water/sugar mix to allow it to rise, or "proof" and can be added to the dry ingredients in a recipe), but after trying a few, I stick with what works.
All of these things are considered somewhat "specialty items" and can be pricey, but buying in bulk works well for us. When I have a little extra cash, I buy 10 lbs of yeast at once. I save on shipping and it lasts for a very long time between my pantry and freezer. The vital wheat gluten can be purchased from Amazon at a huge discount, and the dough enhancer, while not mandatory for a good loaf of bread, can also be purchased in volume for a price break.
So on with the recipe, right?
Sue's Whole Wheat Bread
1 c. hot tap water
1 T. coconut, palm, or olive oil (liquified, if appropriate)
3½ T. honey or agave nectar
3½ T. yogurt, kefir, or sour cream
1½ t. kosher salt
3 T. vital wheat gluten
1 T. dough enhancer
~~~~~~~~~~~~~~~~~~~~~~~
Place the ingredients above in the mixing bowl of a Kitchen Aid stand mixer, mixing with a dough-hook on speed 2 until well-incorporated (about 3 minutes).
In a separate bowl, mix:
13½ - 18 oz. (dry weight) whole wheat flour
1½ T. SAF yeast
~~~~~~~~~~~~~~~~~~~~~~~
With the mixer on speed 2 (only - you will burn out your motor if you use a higher speed), add the dry ingredients to the wet by the spoonful. The flour amount varies, based on the humidity of the day; during the summer, I average the whole 18 ounces and during the winter I typically use about 15½ ounces.
Once the dough-lump has formed, allow the mixer to knead on speed 2 for 12 minutes. You'll know it's the right time to let it knead when you hear a "swish-swish" of the dough-lump and the flour in the mixing bowl. When the dough is done kneading, you'll have a very smooth, uniform lump with no discernible wheat "texture" to it. Roll the dough in oil to lubricate it, put it in a warm area to double in bulk, which takes about 1 hour.
After the first rise, punch down the dough and form rolls (I tend to make mine 2½ ounces of dough per roll, for uniformity's sake) or a loaf of bread. If you make a loaf, roll the dough out to prevent air bubbles from making holes in your bread and then roll the dough tightly, using your fingers to "seal" the roll as you go. Fit the rolled-dough in your pan and allow a second rise of about 30 minutes.
Bake at 350°F for 30 minutes; remove from pan to cool, and slice. You've just baked 100% whole wheat bread with a soft, light texture, a delicious crust, and no artificial sweeteners. Congratulations!
Sue is a photographer, freelance writer/editor, and loves baking bread for her family. You can reach her via email and read her regular ramblings at A Mother's Heart.
Photo credits: freshly-baked bread, courtesy Amber in Norfolk; Norpro bread pans courtesy Marilyn Moll, The Urban Homemaker.
Comments
Sue Talbert
Mon, Mar 15, 2010 : 7:21 p.m.
I've found a few new things in the last month or so regarding dough conditioning, etc. I've been reading up on food storage sites and although dough conditioner is a good thing to have, I've discovered some less-expensive shortcuts that get the job done. Instead of dough conditioner, you can use a combination of potatoes and vinegar. Add 1 t. of white vinegar per 1 t. of instant yeast (do the math for the recipe & quantity of loaves you're making) and either potato water (from cooking potatoes - sub in for the 1 c. of hot tap water in this recipe) or use 1/4 c. plain potato flakes. The starch in the potato water or instant potatoes helps to protect the rise from the sharp edges that the brain of the grain brings to the dance. A protected rise = a more consistent, softer, enjoyable end product. The potato flakes, if chosen, do not need additional water to make the recipe work. Both of these items are easy to store in long-term food storages and/or have on hand without paying specialty-item prices. :)
Sue Talbert
Sat, Feb 6, 2010 : 4:55 p.m.
If you call an ice cream shop (locally), they'll usually have dry ice. For a while, Meijer carried a small cooler of it, but I'm not sure they still have it. I know that dry ice is also regularly used in shipping frozen foods, but it seems a bit much to buy something frozen just for the dry ice.;)
Technojunkie
Sat, Feb 6, 2010 : 4:44 p.m.
I couldn't remember the proper method for using dry ice so I went searching and found these two FAQs: http://www.survival-center.com/foodfaq/ http://www.faqs.org/faqs/food/preserving/part1/ It sounds like using dry ice AND oxygen absorbers is the recommended approach, though it seems a bit much to me. Still, if it'll keep that forgot-to-rotate bucket of food from going bad for an extra few years it's probably worth the trouble. I don't know where to buy dry ice locally though?
Sue Talbert
Fri, Feb 5, 2010 : 1:52 p.m.
Thank you for the links! So far, I've got plans for mylar bags and O2 absorbers; didn't think about the dry ice! :) I saw Gamma Lids elsewhere online (mostly on food storage sites) and buckets, but these prices beat what I saw. I'm bookmarking it now - and if I find a good source of wheat, I'll post it so others can take advantage of it, too. :)
Technojunkie
Fri, Feb 5, 2010 : 11:53 a.m.
If you find a good source for bulk wheat and really want to stock up, 5 gallon food grade plastic buckets and at least a few gamma seal lids are supposed to be the way to go: http://www.usplastic.com/catalog/item.aspx?itemid=23220 http://www.usplastic.com/catalog/item.aspx?itemid=24282 US Plastic is just over the border in Ohio so shipping shouldn't be too bad. Use dry ice sublimation or oxygen absorbing packets to protect your long term storage wheat. I haven't tried this yet.
Technojunkie
Fri, Feb 5, 2010 : 11:10 a.m.
There are a bunch of grain mills listed here: http://www.lehmans.com/store/Kitchen___Grain_and_Grain_Mills Plus the Country Living grain mill: http://countrylivinggrainmills.com/ I want a metal mill too. Whole Foods has red winter wheat for $1.19/pound in bulk, which isn't exactly cheap but they're convenient. I haven't checked People's Food Coop or By The Pound yet. Buying 50 pound sacks from area feed stores, specifying that it's for human consumption, is supposed to be the way to go if you've read Dolly Freed's "Possum Living" (updated and reissued recently) but I'm unfamiliar with such businesses.
Sue Talbert
Thu, Feb 4, 2010 : 11:45 a.m.
Thanks for the feedback! I'm actually avoiding the US-built grain mills; the thoughts online by "experts" (of which I'm not) is that the Nutrimill, WonderMill, etc., heat the flour to a detrimental point. And they are plastic - for all the money they run, I'd rather have something with a smaller footprint and something made of metal. I've decided to go with the KoMo mill (you can find them online), and the base model is $300. Ouch, for sure, but I am saving toward it. In the meantime, I have a Cuisinart Burr Grinder (designed for coffee) that was highly rated by those who use it for grinding wheat. It will buy me time and the amount I'll save on pre-ground flour will help me reach my goals that much more quickly. I'm still looking around for a local source for winter wheat (I prefer white wheat, but regardless...). In the interim, I can find decent prices at ArborFarms, but it looks like I'll have to import wheat in order to make it work long-term. If you search for "food storage" or "bulk wheat berries," you'll find some good options. :) Hope this helps! Happy baking!
Technojunkie
Thu, Feb 4, 2010 : 10:39 a.m.
What grain mill are you looking to buy? The Country Living grain mill seems to be the most recommended but at ~$400, ouch. I'd definitely prefer a sturdy hand cranked mill over electric. Also, where do you buy winter wheat locally in bulk? Good article.