
How to repair a broken sprinkler head
Photo by: Joel Ambrose
Hi Keith,
My grandchildren were over during father’s day weekend and stepped on my underground sprinkler head. It was gushing water out of the head so I turned the water off. I’m fairly handy, but I have never worked on this type of system before. Is this a fairly simple project for the do it yourselfer?
—Mike S., Saline
Hi Mike, I’m glad to hear that you are considering a project which you haven’t attempted before. The good news is that in most cases, repairing a residential irrigation sprinkler head for a system is a relatively simple project.
The two main reasons sprinkler heads fail are:
1. The sprinkler head itself becomes defective, in which case you can unscrew and take it to your local hardware store and purchase one to replace it, or
2. The sprinkler head gets damaged by someone walking over it or it gets run over with a lawn tractor… or as I've seen too many times, a vehicle.
Let’s focus on reason #2, since this appears to be the issue.
The sprinkler system, as a whole, is similar to the PVC piping system in your house but under your lawn. Typically, there is a pipe line from your house, designed in a pattern which allows your system to irrigate your lawn in a predetermined area.
In other words, imagine one single underground pipe running along the perimeter of your lawn, with upside down “T” connections extruding and individual sprinkler heads attached. When the water is turned on, the water pressure causes the sprinkler to open and heads to rise above grade, allowing the water to spray. Most heads allow a spray of a 90-, 180- or 360-degree turn.
The first step would be to dig approximately six inches around the head and eight to 12 inches deep. There will probably be a crack in the head itself or the pipe below, known as the riser. Unscrew or cut the line and be sure that no dirt gets into the water line. Take it to the hardware store for replacement.
Sometimes, (and if you’re lucky), the riser may have a several adjustable connection pieces. If so, remove the damaged portion and reattach.
Here is a sprinkler head tip: Improve your sprinkler head by making it adjustable. Here’s how to do it. Make a swivel assembly by purchasing four 90-degree PVC street ells, (adjustable and moveable elbows), same diameter as your riser. Remove the riser. Connect all four of the elbows and connect into a “U” shape. Turn it sidewise and re-connect the elbows to the riser and sprinkler head.
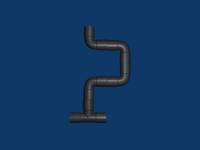
Illustrated by: Nick Paul
This will allow you to move your sprinkler head up and down and the ability to angle and adjust the angle to best fit your needs...all inexpensively.
Enjoy your summer with a fresh, watered lawn!
Paul is a State of Michigan Licensed Builder. Paul serves as president and founding member of Nationally franchised HandyPro Handyman Service, servicing Washtenaw, Wayne and Oakland Counties. www.handypro.com. Listen to Paul every Saturday at 11 a.m. on “It’s Your Business, Make It Happen” WAAM Talk 1600AM. Email questions or comments to kpaul@handypro.com,
Comments
dading dont delete me bro
Fri, Jun 24, 2011 : 3:40 p.m.
reason #3 sprinkler heads fail... don't get properly blown out during fall/pre-winter maintenance and FREEZE over the winter. 1. shut off water. 2. simply unscrew (afte 3. visit your local home improvement store (with the damaged head in hand) 4. return home, drink beer 5. screw in new head 6. turn on water 7. finish 6 pack started (see #4)