
Making maple memories: a Do-it-yourself maple syrup adventure
Cue SFX: Def Leppard, “Pour Some Sugar on Me”
I’m hot, sticky sweet
From my head to my feet, yeah
It’s early spring in Michigan - even if the calendar disagrees, the weather concurs. And in early spring, maple trees everywhere are tapped for their sweet sap. My kitchen is beginning to resemble the line from the Def Leppard song - it’s hot, slightly sticky and sweet in there now as I boil down sap from our maple trees to create maple syrup.
Shortly after I penned my “Confessions of a Do-it-Yourselfer” for AnnArbor.com, we were having a breakfast-dinner at our kitchen table (and consuming some real maple syrup I got from our co-op). I was gazing out the doorwall, noting the maple trees in the back yard, and I wondered aloud if we could make maple syrup from our own trees. My son’s eyes became the size of saucers and he was excited - my husband looked at me with one eyebrow raised, wondering if I’d lost my mind.
In my defense, I thought it would be a great lesson (after all, every day is a learning-day when you homeschool) and figured it couldn’t be that hard to do. My husband’s words were, “I have no idea how to do that,” and I smiled at him, reminding him gently, “When was the last time that stopped me, sweetheart?”
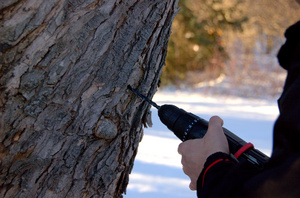
Drilling in to the bark of the sugar maple
It’s true - I’ve learned to harness the power of the Internet to my own benefit. I learned how to darn socks by watching a video on YouTube, I’ve researched how to turn regular patterns in to maternity patterns for a sewing project and everything in between. I was confident that there were resources out there for a family that had an interest and some good-sized maple trees.
So I read up and watched videos on tapping trees and consulted our very own Tammy Mayrend, who’s done this for a few years running.
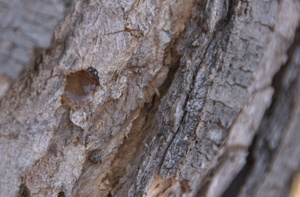
Sap flowing from the drill-hole.
I identified the two maples in our yard as a red and sugar - the sugar maple is much larger and older than the red, but any type of maple tree is fair game for syrup-making, as long as it’s 12 inches in diameter. One thing we’ve noted for the three years we’ve lived here is that the red maple is always the first to bud and the first to shed its leaves. So we knew the sap-collecting on the red maple would be shorter than the sugar maple, but that was okay by us.
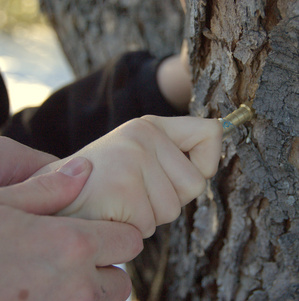
Father & son inserting a brass plumbing piece to drain sap off of the sugar maple
We headed to a hardware store where they had spiles (taps) available - but armed with the knowledge that we didn’t need a specific tap to gather the sap, we asked about plumbing pieces and explained what we wanted to do.
We ended up with four brass plumbing connectors, some polyvinyl tubing, and then came home to rig up milk jugs and begin the collection process.
We didn’t go as deep as we needed to in to the tree, and thus our sap collection rate is far below what others (who have drilled deeper) are getting, but that’s okay - this year was a learning experience, and we’re still getting a fair amount of sap.
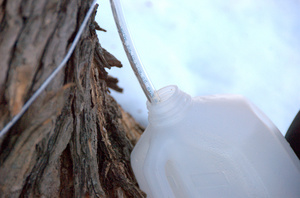
The milk-jug set up with polyvinyl tubing to collect sap
On my first boil-down, I used my largest stock pot, which is six quarts. It was filled almost to the brim with clear sap from our trees, and we disconnected the tap and tubing from our red maple, as the tree was beginning to bud-out. Experts all agree that when a tree begins to bud out, you want to stop collecting the sap.
I set the pot on high on my stove and, in approximately 90 minutes, nearly all of the water was boiled out of the sap, leaving a light amber syrup.
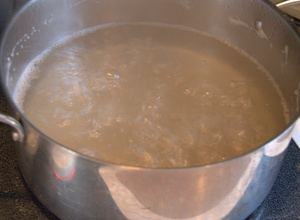
Boiling sap, after approximately 50 percent evaporation.
I read on numerous sites that straining through paper coffee filters would work - the idea is to remove the trace bits of cellulose from the syrup. The cellulose solids aren’t harmful, but they are unappealing and ultimately are the sign of sloppy syrup-making. Tammy, however, warned me that she had much better luck using an old t-shirt as a strainer rather than a paper coffee filter.
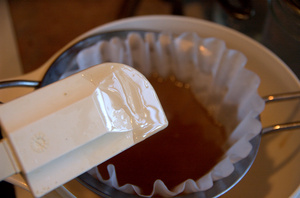
Straining the final syrup.
I heeded her advice, but instead of using an old t-shirt (I simply couldn’t imagine having to answer the questions from my husband and son when they discovered what I’d done), I used a flour-sack towel, which is my preferred method of drying, wiping and cleaning in my kitchen. The towel allowed the sap to easily strain through, leaving the bits of solids behind.
The final product is sweet, slightly buttery-tasting and a solid Grade A in colour and appearance.
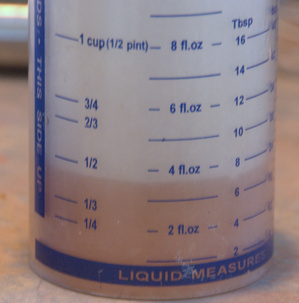
The final yield of 4 ounces of Grade A, homemade maple syrup.
Sue is a wife, mom, photographer, and part-time/seasonal maple-syrup maker. Sometimes her life is sticky, but it's always an adventure and usually fun. You can contact her via e-mail and read her regular ramblings at A Mother's Heart.
All images c. 2010, Sue Talbert, A Mother's Heart Photography