
Bridge column, November 9: If one fails, try the other
At the bridge table, it is very easy to play perfectly tomorrow, after you know where all of the cards lie. The secret of success is making your contract today, before you have seen all of your opponents' cards.
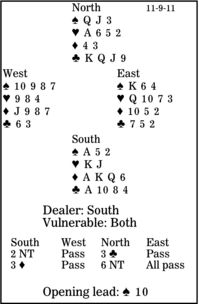
In this six-no-trump contract, how should South plan the play after West leads the spade 10?
North used Stayman to see if there was a 4-4 heart fit, because then six hearts would probably have been a better contract than six no-trump.
South starts with 11 top tricks: two spades (given the lead), two hearts, three diamonds and four clubs. The best chance for another winner is to find East with the heart queen. So declarer covers the spade 10 with dummy's jack and captures East's king with his ace. He then leads a club to the dummy and plays a low heart to his jack.
Here the finesse wins, but what would declarer do if West produced the heart queen and led another spade?
Now there would be only one chance: a red-suit squeeze. South must hope that the opponent with four (or more) diamonds also holds four (or more) hearts. Watching only for heart discards, declarer would win the second spade on the board, play a heart to his king, cash the other three clubs ending on the board, and take the heart ace. Is the heart six high? If it is, cash it and claim. If not, play out the diamonds, hoping that the six takes the last trick.
Copyright 2011 UFS, Dist. by Universal Uclick for UFS