
Posted on Thu, Oct 20, 2011 : 5 a.m.
Bridge column, October 20: The king's a trick; long live the king
By Phillip Alder
The auction could have gone numerous ways, depending on the styles of the players. But the given sequence is reasonable.
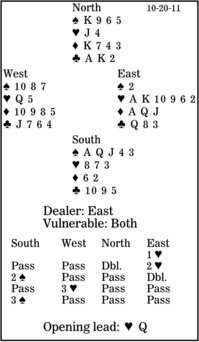
At trick one, East probably decides he would like West to shift to a diamond through dummy's unguarded king. So he will signal with his heart two, asking partner to try elsewhere. And a trusting West would probably next lead the diamond 10. How does declarer react?
South has only eight tricks: five spades, two clubs and a heart ruff in the dummy. He needs to score a trick with the diamond king. But West cannot have the diamond ace, because that would give him six points and he would not have passed over one heart.
Declarer must play low from the dummy at trick two. East wins with his jack, cashes the heart ace, and continues with the heart king. South ruffs in the dummy, draws trumps, and ducks another round of diamonds. He wins East's club switch in the dummy, ruffs a diamond to bring down the ace, plays a club to dummy, and discards his club loser on the diamond king.
What will happen in the post-mortem?
East and West will wonder how West could have found the low-club shift at trick two that would have defeated the contract.
Copyright 2011, UFS, Dist. by Universal Uclick for UFS